Tutorial mkdocs server
Introduction
After running microCI locally in the previous tutorial, we can start automating the pipeline through webhooks and remote execution.
This tutorial shows how a final version is generated and deployed to production from a commit in the working repository.
The execution will follow the figure below:
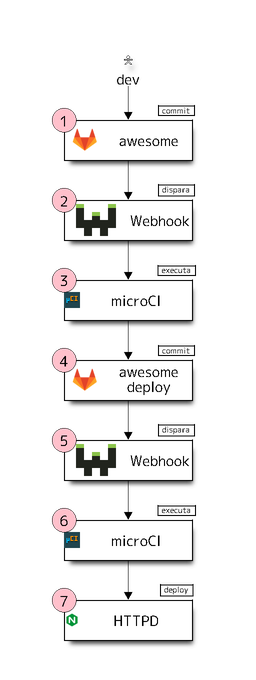
Initial event: The developer updates the documentation, makes a commit, and pushes it to the Git server.
Step 1: The Git server receives the push event with the user's commits and triggers a webhook linked to the repository.
Note: the
pushevent happens only once even if it contains multiplecommits.
Step 2: The webhook server receives the information for the latest commit and runs the script linked to the webhook.
Note: the
webhookserver used in this example can be found at https://github.com/adnanh/webhook.
Below is the declaration of the two webhooks used in this tutorial:
# Triggered in step 2
- id: "microCI_awesome"
  execute-command: "/usr/bin/microCI.sh"
  command-working-directory: "/opt/microCI/repos/awesome/"

# Triggered in step 5
- id: "microCI_awesome_deploy"
  execute-command: "/usr/bin/microCI.sh"
  command-working-directory: "/opt/microCI/repos/awesome_deploy/"
Note: all webhooks run the same script
Step 3: A minimal implementation of the webhook adapter script for microCI can be seen below:
#!/bin/bash
# microCI.sh file
# Add your customizations here

if [ -d ".git" ]; then
  git pull
fi

# This command runs in the repository directory
microCI | bash
Note: The procedure is identical to the local run:
microCIreads the configuration from.microCI.ymland executes the described steps.
# .microCI.yml file for the awesome repository
---
steps:
  - name: "Build documentation as HTML"
    description: "Project documentation"
    plugin:
      name: "mkdocs_material"
      action: "build"
  - name: "Publish HTML to Git repository"
    ssh:
      copy_from: "${HOME}/.ssh"
      copy_to: "/root/.ssh"
    plugin:
      name: "git_publish"
      git_url: "git@your-server-name.com:awesome_deploy.git"
      copy_to: "/deploy"
      copy_from: "site"
      clean_before: true
The mkdocs_material plugin with the build action reads the Markdown files, builds the documentation as HTML, and saves it in the site folder for use in the next step.
The git_publish plugin clones the repository specified by git_url into /deploy, then copies the contents of the site folder into /deploy inside the container, and commits the update to the repository.
Step 4: The awesome_deploy repository receives the post sent by the git_publish plugin in the previous step and triggers another webhook.
Step 5: The webhook server receives the information for the latest commit and runs the script linked to the webhook.
# Triggered in step 5
- id: "microCI_awesome_deploy"
  execute-command: "/usr/bin/microCI.sh"
  command-working-directory: "/opt/microCI/repos/awesome_deploy/"
Note: it performs the same procedure as step 2, but this time in the
awesome_deployrepository folder.
Step 6: microCI runs the git_deploy plugin, which checks out the repository into the deployment folder. To ensure older commits are not available in production, the checkout is split: the history (.git) stays in a private folder, and only the files from the latest commit are placed in the specified deploy path.
Step 7: The updated deploy folder from the previous step is now available in production.